必備知識:
Hugo、shell、npm、git
前言
原本部落格是部署在 GitHub 自家提供的靜態網頁 GitHub Page 上,但因為 GitHub 對於免費帳號的限制(給你免費用還嫌東嫌西),若要使用 GitHub Page 部署網頁,程式庫(repository)就要維持開源(public)的狀態,但是我希望將自己部落格的程式庫設定為私人的(private),畢竟尚未完成的草稿也在上面,並不想給別人看到。(是說這麼冷清的部落格,沒人會沒事去翻你的原始碼)於是,就來研究有哪些可以部署靜態網頁的平台,其中兩個是我比較感興趣的,分別是:Deno 與 Vercel。想記錄一下設定部署的過程及遇到的問題。
部署 Vercel
Vercel 是一個很有名的前端部署平台,也是 Next.js 官方推薦的部署平台。它提供了「一鍵部署」的懶人功能,但由於我想用 GitHub Actions 自行寫腳本執行部署的動作,所以就不用一鍵部署了。
我參考網路上一位來自烏克蘭的工程師 Oleh Andrushko 的文章,其實他的描述已經很詳細清楚了,但我又撞到了一些奇怪的問題,因此卡了好一段時間。
前置作業
- 在本機安裝 Vercel CLI
- 以 GitHub 帳號登入 Vercel CLI
- 準備部署 Vercel 所需的三把鑰匙(Vercel 帳號憑證、Vercel 組織 Id、Vercel 專案 Id)
安裝 Vercel CLI 與登入 Vercel 帳號
首先,我們必須在本機以 npm 全域安裝 Vercel CLI:
npm i -g vercel
安裝完成後,開啟終端機(MacOS 的 terminal 或是 Windows 的 cmd),輸入 vercel,第一次安裝完通常會出現要求登入的訊息:
vercel
Vercel CLI 28.10.1
> > No existing credentials found. Please log in:
> Log in to Vercel (Use arrow keys)
❯ Continue with GitHub
  Continue with GitLab
  Continue with Bitbucket
  Continue with Email
  Continue with SAML Single Sign-On
  ─────────────────────────────────
  Cancel
這裡選擇以 GitHub 登入 Vercel:
> Log in to Vercel github
> Please visit the following URL in your web browser:
> Success! GitHub authentication complete for "<你 GitHub 登入所使用的 email>"
? You are deploying your home directory. Do you want to continue? [y/N] n
最後會問你是否要部署 home 目錄,我們沒有要部署 home 目錄,所以選擇 n。
取得所需的密鑰
進入要部署的專案資料匣位置,再下一次 vercel 指令:
vercel
Vercel CLI 28.10.1
? Set up and deploy "<你的 repo 的本地位置>"? [Y/n] y
? Which scope do you want to deploy to? "<你的 GitHub 名字>"
? Link to existing project? [y/N] n
? What’s your project’s name? "<你的 repo 名稱>"
? In which directory is your code located? ./
Auto-detected Project Settings (Hugo):
- Build Command: hugo -D --gc
- Development Command: hugo server -D -w -p $PORT
- Install Command: None
- Output Directory: `public` or `publishDir` from the `config` file
? Want to modify these settings? [y/N] n
⠸ Deploying "<你的 Vercel 帳號名稱>/<部署專案名稱>"
🔗  Linked to "<你的 Vercel 帳號名稱>/<部署專案名稱>" (created .vercel and added it to .gitignore)
🔍  Inspect: "<Vercel 部署專案的頁面網址>" [2s]
✅  Preview: "<Vercel 部署後預覽的網址>" [10s]
📝  To deploy to production (hugo-test-navy.vercel.app), run `vercel --prod`
執行 vercel 指令後,會在根目錄自動產生 .vercel 資料匣,裡面會有兩支檔案,分別是 project.json 與 README.txt,而我們要關注的是 project.json,其內容如下:
{
  "projectId": "<你的 Vercel 專案 Id>",
  "orgId": "<你的 Vercel 組織 Id>"
}
在此我們取得了「Vercel 組織 Id」、「Vercel 專案 Id」兩把鑰匙。
切記這兩組 Id 是必須保密的,所以方才跑 vercel 指令的時候,有加入 .gitignore,脫離版本控制。詳細描述在 README.txt 裡面。
第三把鑰匙「Vercel 帳號憑證」則要前往 Tokens – Account – Dashboard – Vercel,手動建立一個 GitHub 與 Vercel 建立連線的憑證。
設定 GitHub Actions
設定密鑰
前往 GitHub 的 repo,進入 Actions secrets 的設定頁面:repo > Settings > Secrets > Actions(如果找不到,網址會是:https://github.com/<你的 GitHub 帳號>/<repo 名稱>/settings/secrets/actions),然後按 New repository secret 將這三個密鑰加進去。
建立 GitHub Actions 腳本
在本機的 repo 裡建立 GitHub Actions 的部署腳本:/.github/workflows/vercel-prod.yaml(註:檔案名稱可以任意取)
內容則參考 Oleh 的範例去修改,內容請參考以下連結:GitHub Actions for Vercel Deployment
複寫 Vercel 自動建置(build)設定
因為我們要使用自己的 GitHub Actions 腳本進行建置的動作,所以要複寫掉 Vercel 的自動建置。
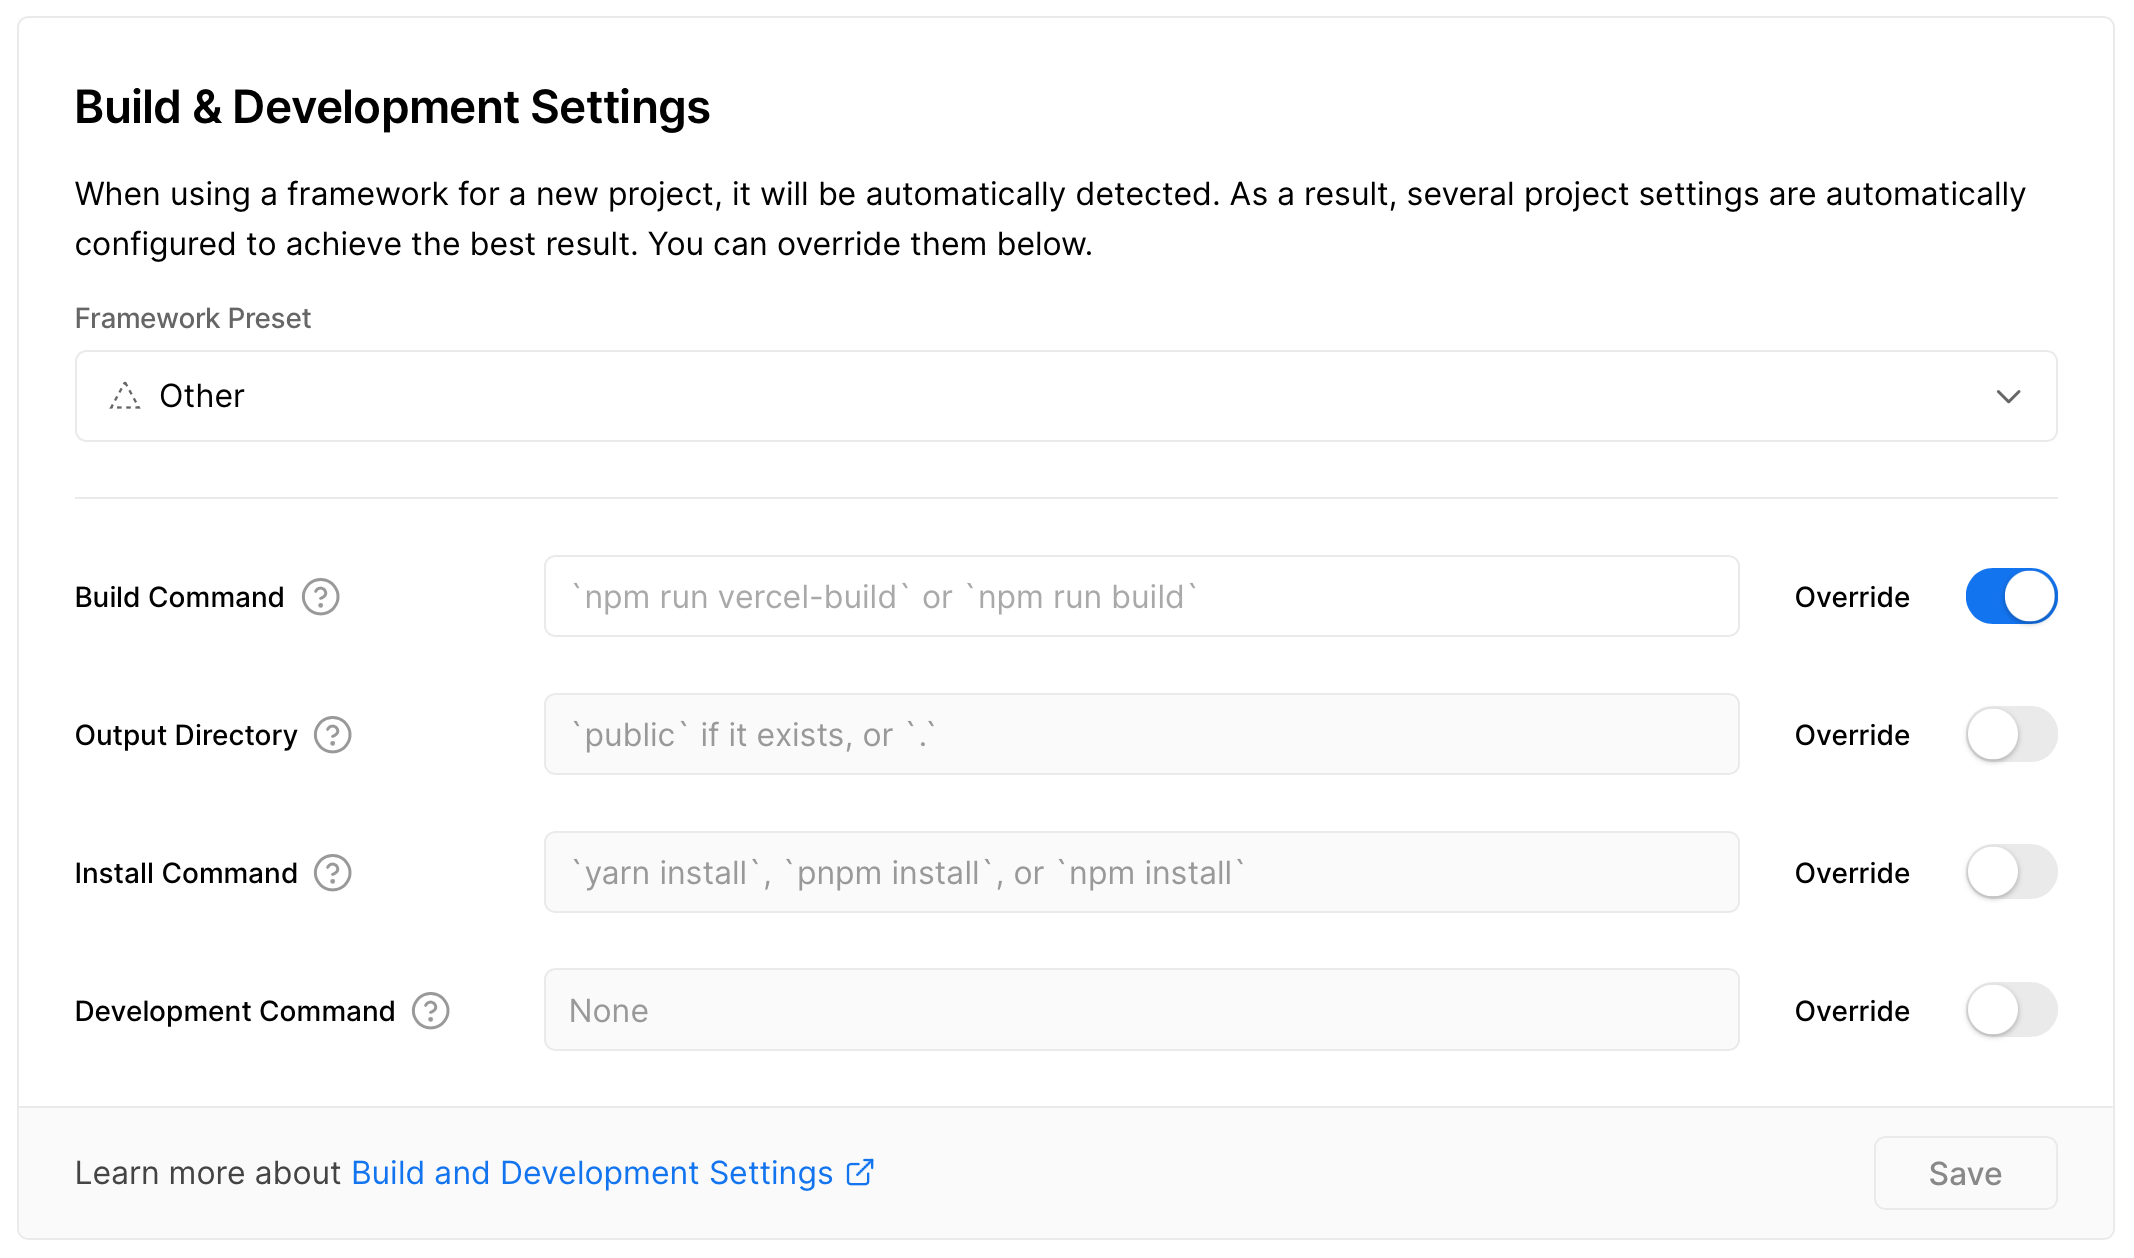
參考 vercel-action 部署工具的文件,前往 Vercel 專案的設定頁面 repo > Settings > General,在 Build & Development Settings 區塊中,Framework Preset 會自動偵測,自動帶入「Hugo」,在此選取「Other」,然後將「BUILD COMMAND」右方的 Override 按鈕開啟,複寫的值為「空」,若 Vercel 阻擋空值儲存,則加一個「空白」可以解決問題,設定結果請參考下圖:
障礙排除
部署的路徑錯誤
GitHub Actions 的錯誤訊息:
Error: No Output Directory named "public" found after the Build completed. You can configure the Output Directory in your Project Settings.
依據 Oleh 的部署腳本,它的部署路徑是 public:
- name: Deploy to Vercel
  uses: amondnet/vercel-action@v20
  id: vercel-action
  with:
    vercel-token: ${{ secrets.VERCEL_TOKEN }}
    vercel-org-id: ${{ secrets.VERCEL_ORG_ID }}
    vercel-project-id: ${{ secrets.VERCEL_PROJECT_ID }}
    github-comment: false
    vercel-args: --prod
    working-directory: public # 這裡產生錯誤
我將 working-directory: public 這行移除,就能正常部署了
env 環境變數錯誤
GitHub Actions 的錯誤訊息:
Error: Input required and not supplied: env
  at getInput
加入 env 參數:
- name: Update Deployment Status
  uses: bobheadxi/deployments@v1
  if: always()
  with:
    step: finish
    token: ${{ secrets.GITHUB_TOKEN }}
    status: ${{ job.status }}
    env: ${{ steps.deployment.outputs.env }} # 這裡加入 env 參數
    deployment_id: ${{ steps.deployment.outputs.deployment_id }}
    env_url: ${{ steps.vercel-action.outputs.preview-url }}
Node 舊版本的提示
錯誤訊息:
vercel-production
Node.js 12 actions are deprecated. For more information see: https://github.blog/changelog/2022-09-22-github-actions-all-actions-will-begin-running-on-node16-instead-of-node12/. Please update the following actions to use Node.js 16: amondnet/vercel-action@v20
Node 12 版本即將不支援這類提示性訊息,並不會造成部署的錯誤,只是在提醒而已。根據訊息,將使用的 GitHub Actions 工具升級到最新版(前往該工具的開源專案,就可以得知最新的版號),就可以消除提示訊息了。
後記
以上是紀錄我使用 GitHub Actions 腳本自動部署到 Vercel 的過程、設定以及碰到的一些小問題。
一開始也提到,在經過了一番的調查之後,部署平台的口袋名單有 Vercel 與 Deno。最後採用 Vercel 的原因是,它提供了兩個部署環境:Preview 與 Production,於是我們可以寫兩份 GitHub Actions 腳本,分別部署 develop 與 main 分支,雖然最後我並沒有使用到 Vercel 預覽環境。然而因為我對於部落格的 Git flow 流程 1 是直接在 main 分支寫稿上並推上遠端(反正在 markdown 裡的 front matter 可以設定為草稿,在建置的時候就會略過尚未完成的文章),此外設定除了分支名稱、一些設定不太一樣之外,都大同小異,有如此 Git flow 需求的同學,可以參考烏克蘭老兄的文章。
此外,估計也會記錄一下部署 Deno 的流程,形式上也會跟本篇差不多。
參考資料
- Building a personal blog with Hugo and Vercel
- amondnet/vercel-action: This action make a deployment with github actions instead of Vercel builder.
關於部落格的 Git flow 流程,我有寫一篇短文描述這件事:GitFlow & Blog Version Control ↩︎